DIY Solar AC Installation: Garage Mini Split Review (South Florida, 1 Year Later)
Airspool mini-split solar AC review from a South Florida garage gym install. Full DIY solar AC installation guide, real performance data, financial payback math, and how it held up a year later.
My garage doubles as a gym and workshop, and in South Florida that means summer is a problem. Without doing something about the heat and humidity, it goes from uncomfortable to genuinely miserable fast — and the portable AC I'd been running wasn't cutting it. That's what led me to install a solar AC mini split. A year later, here's an honest look at how it went and if going solar was worth it.
The portable unit I replaced drew 1,400 to 1,500 watts of constant grid power, was loud enough to make it hard to be in the same room, and the moment the garage door opened, every bit of cool air you'd paid for escaped outside. The part that bothered me most was the waste. When I found the Airspool hybrid solar mini split, the solar angle wasn't idealism — it was practicality. The ability to DIY the install without an HVAC technician is what pushed it from "interesting" to "I'm doing this."
Why Solar AC Makes Sense Now
Solar air conditioners do exist — and they actually work. But whether they made financial sense for a typical homeowner is a question with a more recent answer. Solar-powered air conditioning has been technically possible for a long time. It wasn't cost effective until recently for two reasons: solar panels were expensive, and making a standard AC unit run on DC solar power required an inverter, expensive batteries, and additional control hardware that added cost and complexity. From a practical sense, it was more effective to do whole-house solar to offset power use than use it for a single appliance like a mini-split air conditioner for the garage.
Recently, four things changed that equation:
Solar panel costs collapsed. Panels are roughly a quarter of what they cost ten years ago, following what the industry calls the Swanson Effect — costs drop about 20% for every doubling of total panels installed globally. At current prices, panels produce electricity cheaper than burning coal.
New hybrid AC technology. Modern mini splits like the Airspool run their compressor and fans on direct current — the same type of power solar panels produce. Onboard electronics handle the hybrid blending: solar power is used first, and when it's insufficient (cloudy, nighttime), grid AC current fills the gap. No external inverter, no charge controller, no battery bank required. The panels connect directly to the outdoor unit which automatically handles constantly changing solar voltage input due to cloud cover, time of day, and so on, varying output and supplementing with grid power without needing expensive batteries.
A 30% federal tax credit. As of 2023, the Inflation Reduction Act provides a 30% tax credit (not a deduction — money directly off your tax bill) for solar panel costs and installation, and for Energy Star-certified heat pumps like the Airspool MS12 and their installation. This credit runs through 2033 and applies to primary residences — and it meaningfully changes the payback math.
DIY-friendly solar. As solar has become more popular, more information and parts have become available to homeowners for self-installs on off-grid projects like this.
- Both Airspool and EG4 sell direct to consumer DIY-friendly pre-charged mini-splits that don't require special HVAC tools to install
- Many local or online shops that will sell larger 400+ watt panels to consumers directly
- Many choices of reliable ground or roof mounts for solar panels
What Is the Airspool MS12 Quick and Easy?
The Airspool MS12 is a 12,000 BTU (1-ton) hybrid solar mini split. The "Quick and Easy" model is the DIY-focused version — and unlike traditional mini splits, no vacuum pump is required. The refrigerant lines come pre-charged, which also eliminates the need for a manifold gauge set and nitrogen tank — equipment most homeowners don't own and won't use again. The connectors are self-sealing, so no torque wrench is needed. The communications cable between the indoor and outdoor units is pre-wired. The solar wiring (MC4 connectors) is pre-attached to the outdoor unit. Skipping the installer saves significantly on the total cost.
In theory, the only tool you need is a drill. In practice for South Florida, you'll need more than that for CBS construction homes (vs wood frame) — but we'll get to that.
Airspool MS12 Unboxing: What's in the Kit
After extensive research I landed on the Airspool over the EG4 — both are similar products, but Airspool's reputation for a more turnkey setup, clearer instructions, and a complete kit (minus the solar panels) is what sold me.
The kit arrived well-packaged. Inside:
- Indoor cassette with pre-attached lineset
- Outdoor compressor with pre-installed MC4 solar whips and DC isolator
- Mounting bracket for the indoor unit
- Remote control with wall holder
- Full-color printed manual in clear English (not a rough translation)
- Hole saw (carbide-tipped, SDS-compatible)
- Drill bits for concrete and wood/drywall
- Phillips bit
- Miniature level
- Gloves
- MC4 disconnect tool and spare MC4 connectors
- Electrical tape, foam insulation tape
- Penetration sealing putty and wall sleeve
One thing that stood out immediately: this felt like a kit assembled by someone who had actually done an install. The manual had real color photographs. The accessories weren't afterthoughts. It really did seem like it had everything I needed.
DIY Solar AC Installation: Step by Step
I watched and rewatched the install videos on the Airspool website before starting, both to get comfortable with the steps and to think through what I'd need to adapt for CBS construction and my specific space. Pre-planning paid off — read through the manual on their website and check the ideal mounting location measurements before you begin.
Mounting the Mini Split Indoor Bracket
Rather than drilling masonry anchors into my garage wall, I adapted the included bracket to mount on my existing Gladiator GarageWorks slat wall system using machine screws into a modified shelf bracket. This let me position the unit exactly where I wanted it and adjust left-to-right without committing to a single drill point. If you have a similar track system in your garage, this is worth considering — it saved me from putting permanent holes in the block wall.
The manual specifies that the 2.5-inch wall penetration for the lineset needs to be positioned 6.5 inches from a reference point on the bracket. Mark this before mounting. The hole needs to be drilled at a 15-degree downward angle toward the outside so the condensation drain runs by gravity. This is very important because if the angle is too flat cold water will linger in the condensation drain tube too long and potentially cause the outside of the tube to sweat and drip water inside.
Drilling Through Concrete Block Walls for Mini Split Lines
This is where South Florida installs diverge from the videos made in wood-frame houses.
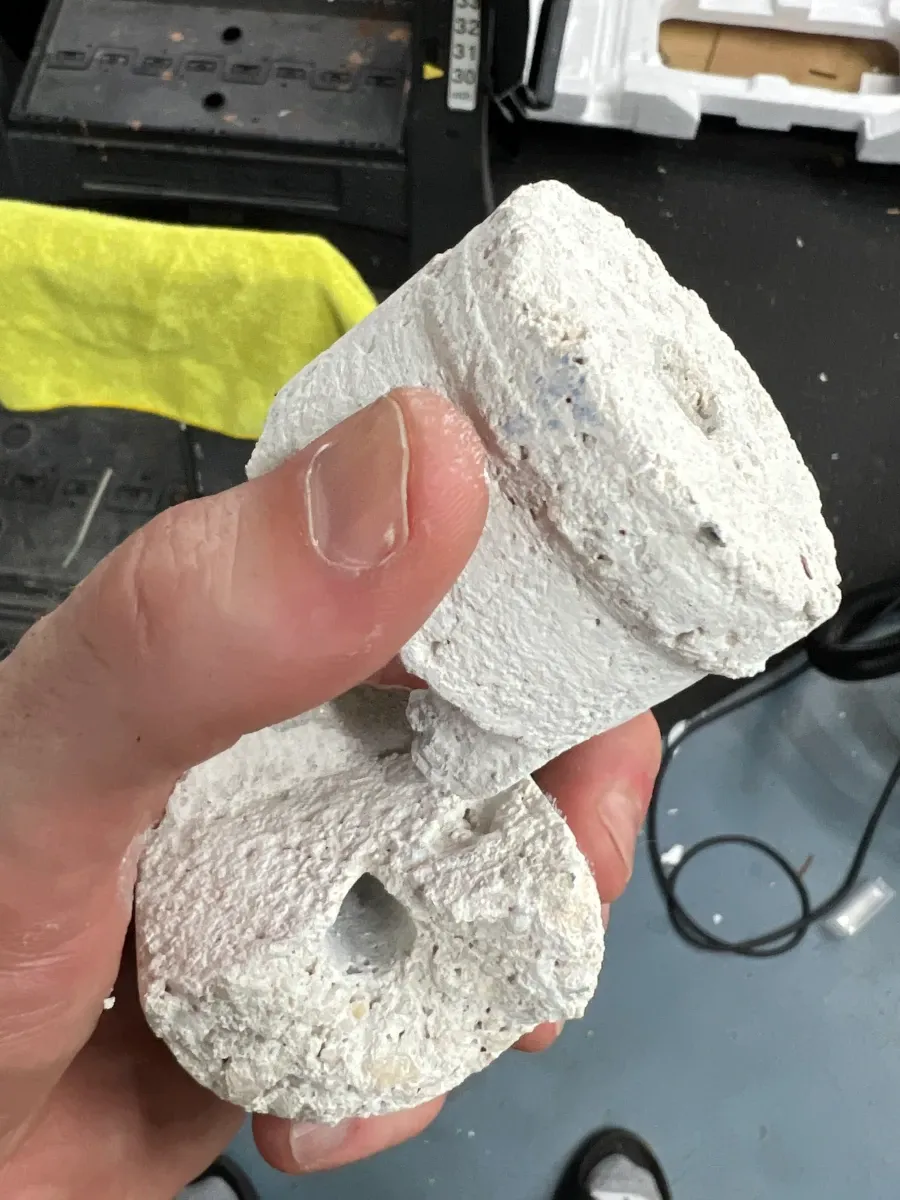
The included hole saw is carbide-tipped, SDS-compatible, and rated for concrete. It will work on standard construction. My garage walls are concrete block — CBS (concrete block structure) — which is the dominant construction type in South Florida and most of Florida. My walls measured approximately 8 inches thick, which pushed beyond what the included saw could reach in a single pass.
My approach:
- Pilot hole with a concrete bit to establish the line and angle
- Switched to the included SDS hole saw to make progress — hit the hollow interior cavity of the block, which helped
- Finished through the outer face from the exterior using a longer 2.5" diamond core bit with my Bosch SDS-Plus rotary hammer
If your home is CBS construction, budget for a diamond core bit. The included saw is not insufficient — it got through a significant portion of the wall — but an 8-inch block will require backup tooling. The good news: once you have both pilot bits on the same line, getting a clean hole through the exterior face is straightforward.
For drilling: use rotary-only mode for the carbide hole saw (hammer mode will damage carbide). Switch to hammer mode for the concrete pilot bit and the SDS work. I used this diamond core bit which worked very well — go slow and let the bit do the work, and back off immediately if it binds.
Mounting the Indoor Cassette
With the bracket secure and the hole drilled, the indoor unit mounts onto the bracket after routing the lineset through the wall. The lineset is soft copper — unbend it with your hands using a pivot point, not a sharp kink. This was the most nerve-racking part, so take it slow. Once it's unfolded, route the condensation drain, lineset, and communications cable through the wall in that order. It's helpful having a second person assist here — the cassette isn't extremely heavy but is large and awkward to balance while feeding the lines through the hole. Make sure the condensation drain tube sits at the bottom of the bundle and maintains a consistent downward slope so condensation drains freely.
Wall Mounting the Compressor (in Hurricane Zones)
I mounted the outdoor compressor on a stainless steel mini split wall mount engineered and certified for hurricane zones, rather than a hurricane-rated ground pad. In South Florida, a concrete pad can be code-compliant if stamped by an engineer (requirements vary by area), but it's significantly more involved for a DIY setup. I considered the ground pad route but sourcing and installing a certified hurricane pad would have required hiring an HVAC company, negating the cost savings. The wall mount I found from Diversitech has engineering certifications for hurricane zones, and in practice it's extremely solid with no vibration in operation.
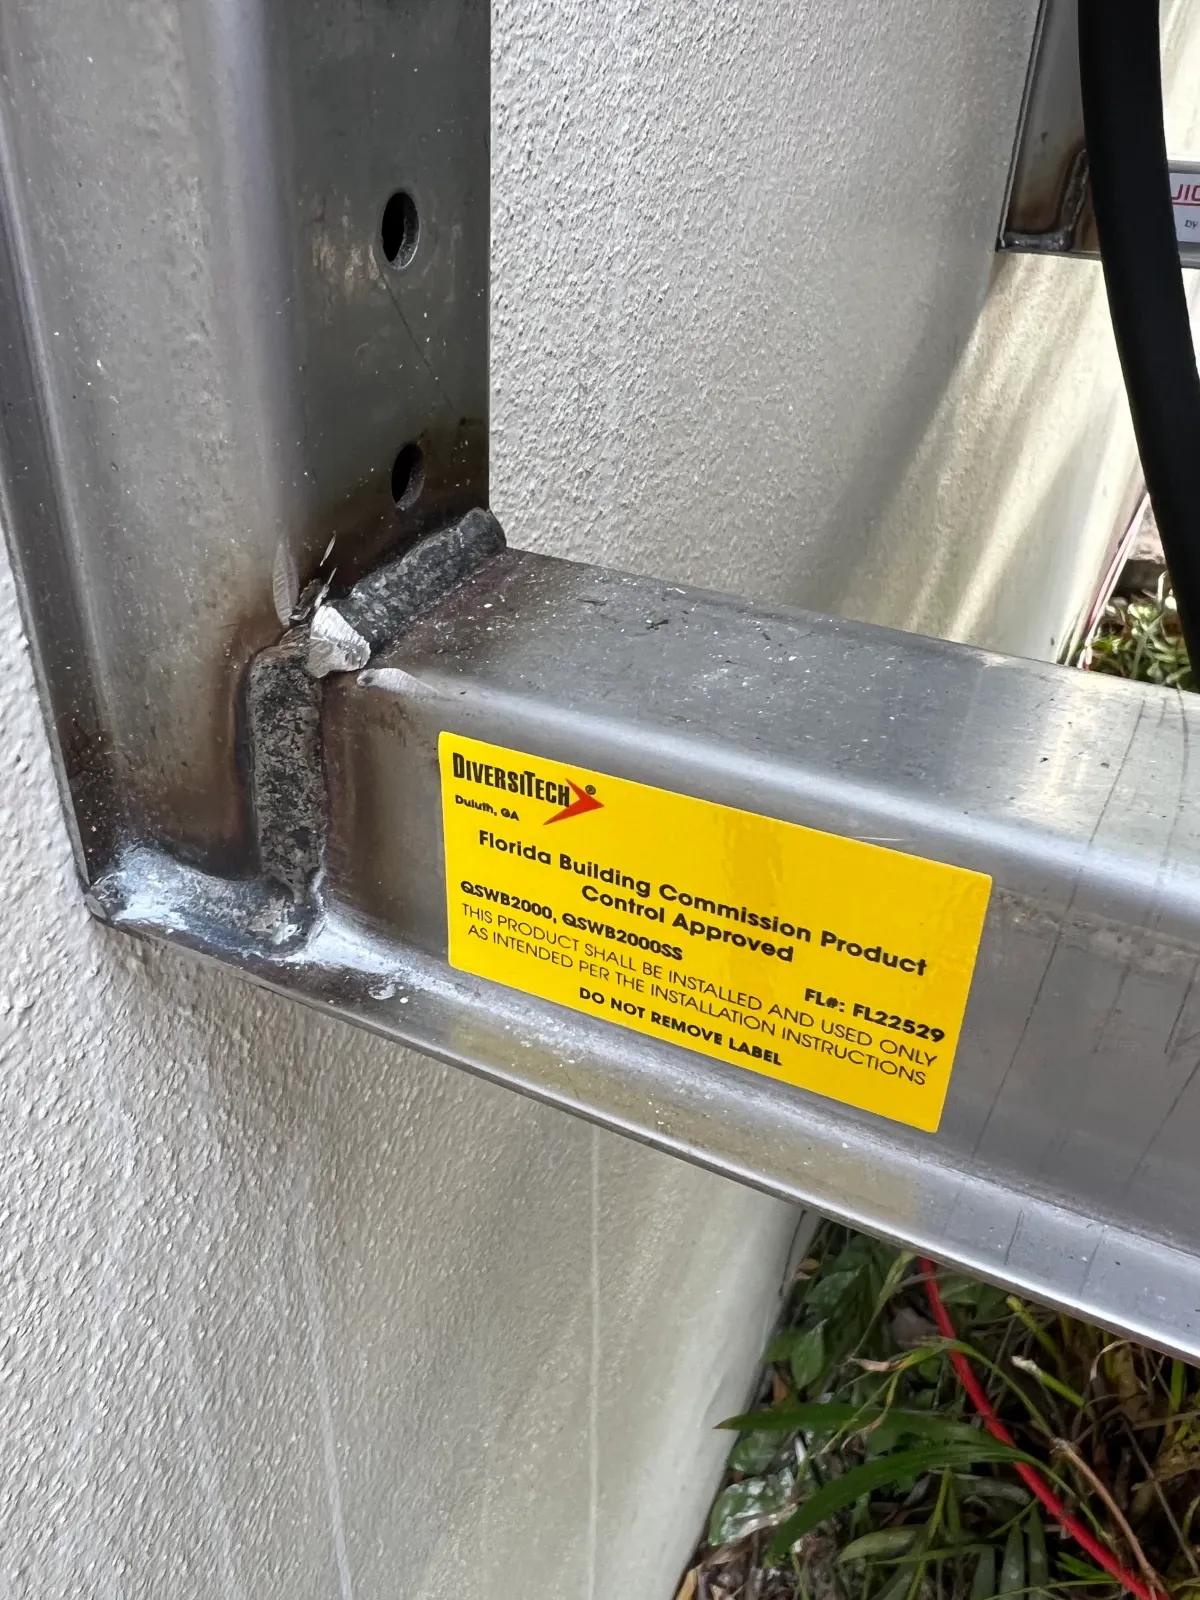
One note on the wall mount instructions: the documentation for the mount itself was poorly organized about the order of operations. The rubber vibration dampers go under the compressor feet before tightening the bolts — the instructions bury this. Set them before you lower the unit into position.
After mounting, bend the refrigerant lines gently down the wall using your hands as a pivot — slow and controlled to avoid kinking the copper.
Connecting the Refrigerant Lines
This is the step that requires a vacuum pump and specialized tools on a traditional mini split. On the Quick and Easy, you hand-tighten the self-sealing connectors until the fittings are fully seated with no gap. Both high and low pressure lines connect this way. It's genuinely simple.
After connecting:
- Wrap any exposed copper with the included black electrical tape first, then the foam insulation tape
- Connect the communications cable (twist-lock connector on the outdoor unit)
- Use the included penetration putty and wall sleeve to seal the hole
At this point I connected the AC power cable and verified the unit could power up and produce cold air — it did, after a short startup cycle.
Once everything checked out, I connected the MC4 solar whips from the outdoor unit to the DC isolator switch, then connected the isolator to the solar array.
Connect the DC isolator switch in line between the array and the unit — this lets you kill solar input during storms or array maintenance more safely without disconnecting anything else. Research why these are important ahead of time.
Airspool MS12 Real World Performance Data
The short answer is yes, and with numbers.
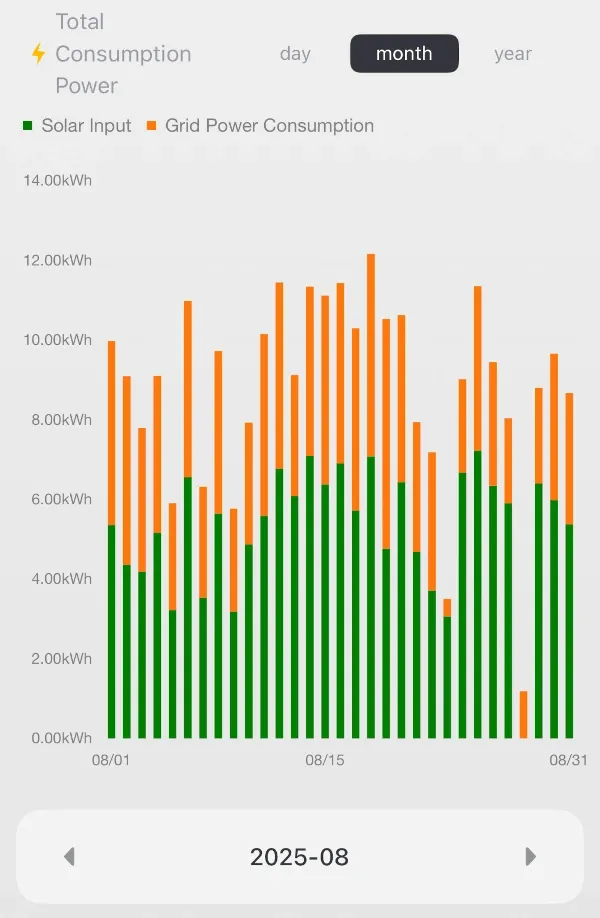
After connecting to my 1,600-watt solar array and powering up:
- Starting power draw: ~250 watts before cold air begins
- Peak power draw: ~1,000 watts when working hard in extreme heat
- Solar runtime: Array begins producing enough power at around 9:00 AM, compressor runs until approximately 5:00 PM before transitioning to fan-only mode
- Cooling in an uninsulated 2-car garage: Down to 76-77°F when it was 94°F or above outside
- Humidity: Dropped from South Florida's typical outdoor 70-90% summer range down to the mid-to-lower 50% range
That last point matters more than the temperature number for anyone planning to actually work in the space. The portable unit I replaced was loud, drew 1,400-1,500 watts continuously at full grid rate, and barely touched the humidity. The Airspool is whisper quiet, and the humidity reduction alone transformed the garage into a space I actually want to spend time in.
For reference, the vendor rates the unit's operating range at 14°F to 136°F. South Florida summers peak well below that upper limit, though the variable-speed compressor does work harder in humid heat than in dry desert heat like Las Vegas — both are within the operating range, but humid climates push the system harder at equivalent temperatures.
The AC Fallback
When solar isn't sufficient — early morning, evening, cloudy days — the unit draws from grid power via a standard extension cord. The Airspool app includes an AC limiter that lets you throttle how much grid power it pulls, which is useful if you want to minimize consumption at night. You can also schedule on/off times by day of week through the app.
One app limitation worth knowing: as of my install, you can set on/off schedules but cannot set different temperature targets at different times. It's a feature I'd like to see added.
Airspool MS12 One Year Later: Long-Term Reliability
The unit has run through a full South Florida summer and into the following year without issues. No refrigerant loss, no performance degradation, no hardware problems.
The biggest performance improvement came from a step I took after the install: adding insulated panels to the garage door. In the video I mentioned this as a planned next step, expecting it might drop temperatures a few degrees by reducing radiant heat transfer through the metal door. The result was more dramatic than I anticipated.
With garage door insulation:
- Same conditions (90s outside), the garage now reaches 71-72°F vs. the 76-77°F before
- That's approximately a 5°F improvement from the insulation alone
If you're doing this install, budget for garage door insulation as part of the project. The mini split is doing less work, running more efficiently, and the space is noticeably more comfortable. It's an inexpensive addition relative to the system itself.
Fall Season
South Florida's fall brings milder temperatures in the 60–80°F range, and the unit doesn't need the same 1,000-watt summer draw to keep up — it easily holds the garage in the mid-to-upper 60s°F in those conditions. We had an unusually cold stretch this year with temperatures dipping into the 30s°F, which is rare for South Florida, so I also got to test the heat function. It worked fine. For anyone in colder climates, Airspool does sell a version of the MS12 optimized for cold weather operation if that's your primary use case.
Solar Mini Split Cost and Payback
The honest comparison against the portable AC I was running:
| Portable AC | Airspool (solar hours) | |
|---|---|---|
| Power draw | 1,400-1,500W | 250-1,000W |
| Energy source | Grid (paid) | Solar (free) |
| Noise | Loud | Quiet |
| Humidity control | Minimal | Significant |
| Cycling | Constant on/off | Variable-speed, holds setpoint |
The Airspool MS12 Quick and Easy isn't cheap upfront, so let's do the math honestly. All figures are rounded.
What I Spent
| Item | Cost |
|---|---|
| MS12 Mini-Split | $2,256 |
| Solar Panels | $1,100 |
| Ground Mount | $1,100 |
| Misc Solar Equipment | $100 |
| Total | $4,556 |
Since I was going to air condition the garage regardless, the fair comparison isn't the full $4,556 — it's the premium over a comparable non-solar DIY mini split. The MRCOOL 5th Gen 12,000 BTU is $2,359 at Lowe's as of writing. That makes the net solar premium $2,197.
What I'm Saving
From June 2025 to March 2026 — about 9 months, not including a full second summer — the Airspool app logged 928,709 Wh (928.7 kWh) of pure solar energy. At FPL's approximate residential rate, that's around $140 in free electricity over 9 months.
Extrapolated to a full year (and this estimate is conservative since it includes the lower-draw fall and winter months): roughly 1,238 kWh, or ~$185/year.
Payback Without the Tax Credit
$2,197 ÷ $185/year = ~11.9 years
That's a long payback on paper, and I won't pretend otherwise. Mini splits are generally rated to last 15–20 years, so you'd come out ahead over the full lifespan — but just barely without the credit. That said, the $185/year figure is based on today's utility rates. As electricity costs continue to rise, that annual savings number grows, which shortens the payback period over time.
Payback With the 30% Federal Tax Credit
This is where the math changes significantly. The Inflation Reduction Act (IRA) provides a 30% tax credit via Form 5695 — not a deduction, money directly off your tax bill — for qualifying solar equipment and Energy Star-certified heat pumps like the Airspool MS12. It applies to the panels, mount, and unit, and runs through 2033 for primary residences. (I'm not a tax professional — verify eligibility with your accountant or tax preparer before assuming this applies to your situation.)
30% of $4,556 = ~$1,367 back
That brings the net solar premium down from $2,197 to ~$830.
$830 ÷ $185/year = ~4.5 years
Under five years to break even on the solar premium, with 10+ years of useful life remaining — that's a reasonable investment by any measure.
Additional Benefits Not in the Math
A few factors that improve the real-world case further but are hard to quantify:
- My central AC air handler sits in the garage, which was previously an unconditioned space. Running an HVAC system in an unconditioned South Florida garage causes it to work harder, and can lead to condensation and rust on the unit over time. Now that the garage stays in the low 70s, that problem is solved — likely extending the life of my central AC and improving its efficiency slightly.
- The $185/year estimate will likely grow as electricity rates increase over time.
- I replaced a portable unit I was already paying to run — so some of that solar savings was money I was actively spending before.
Backup cooling when your central AC fails. In South Florida, when central AC goes down in August, HVAC repair wait times can stretch days. Having a dedicated unit that can keep at least one space in the house livable — whether that's a bedroom adjacent to the garage or the garage itself with the door cracked — is a meaningful insurance policy that doesn't show up in any payback calculation.
Hurricane resilience. This one is specific to the hybrid solar design and worth calling out directly. Whole-house grid-tied solar systems are required to shut off during grid outages for safety reasons — meaning they provide no power when the grid is down. The Airspool operates differently: as long as the sun is shining, it runs entirely on solar regardless of grid status. In South Florida, where hurricanes can knock out power for days or weeks, that's not a comfort feature — it's a safety feature. Post-storm heat in South Florida is dangerous, and having a cooling option that doesn't depend on FPL restoring your power is something you can't easily put a dollar value on until you need it.
Airspool MS12 Limitations and Drawbacks
CBS walls require extra tooling. The included hole saw is not enough for 8-inch concrete block. If your home is CBS construction (most of South Florida is), add a diamond core bit and SDS hammer drill to your tool list.
Nighttime and cloudy periods use grid power. This is by design — the hybrid approach is what makes the system affordable and practical. If your use case requires truly off-grid 24-hour operation, you'd need batteries, and the math on that is unfavorable.
Solar panel placement matters more than you'd expect. The panels wire in series to achieve the voltage the system needs, which means shading even one panel reduces the output of the entire string. Choose your solar panel install location carefully.
The app doesn't support temperature scheduling. You can set the temperature and schedule on/off times but not set different temperatures at different times of day. Useful feature missing. Otherwise, no complaints about the app.
It's a 1-ton unit. The MS12 cools a single space well — my two-car garage gym in particular. It's not a whole-house solution, and it's not meant to be. For a garage, workshop, spare room, attic space, or any area without ductwork, it's appropriately sized. For South Florida, it's on the edge of its capabilities in peak summer if your garage is very leaky or uninsulated. Since my initial purchase larger units have become available to handle multiple rooms, but require many more panels.
Is the Airspool Solar Mini Split Worth It?
For the specific use case — garage, workshop, or any space you want to cool affordably without paying for a full HVAC installation — yes. I can't overstate how much more comfortable it made working in the garage. And for South Florida specifically, having a cooling option that works when the grid is down pushed this well past "worth it" for me.
The combination of genuine DIY installation (with the CBS wall caveat noted), solar operation during peak heat hours, real humidity control, and quiet variable-speed operation is hard to match at this price point. The portable unit I replaced was more expensive to run every single day while being less effective and more annoying to live with.
A year in, no complaints. The addition of garage door insulation pushed the performance beyond what I expected at the time of install.
If you're setting up the solar panels to power it, that process is covered in a separate guide. If you already have panels with available capacity, connecting the Airspool is the easier part of the project.