DIY Garage Door Insulation: Does EPS Foam Actually Work? (FLIR Proof)
Added a $138 EPS foam insulation kit to my Florida garage door and tested it with a FLIR thermal camera. Real before-and-after results, weight and spring considerations, and how it changed my mini-split's performance year-round.
In South Florida, an uninsulated metal garage door might as well be a wall-sized radiator. After installing a solar-powered mini-split AC to make my garage gym usable year-round, I quickly realized the door itself was fighting me. On a hot day, the uninsulated metal panels were radiating enough heat that the mini-split was spending most of its capacity just countering what the door was dumping in. The fix turned out to be simpler and cheaper than I expected — and in hindsight, it should have been the first thing I did.
Garage Door Insulation vs. Replacing the Door — Is It Worth It?
Before buying foam panels, the obvious question is whether you should just replace the door with a pre-insulated one. Here's the honest math:
- A new insulated garage door (installed) runs roughly $800–$2,000+ depending on size, style, and installer
- The Insulfoam EPS kit from Lowe's runs about $69 per package — a standard two-car garage door takes two kits, so $138 total
The gap is significant enough that insulating the existing door almost always wins unless your door is already due for replacement for other reasons (damage, age, failing hardware). For a door in serviceable condition, $138 and an afternoon is the clear answer.
The insulated door replacement also makes sense if you want a higher R-value. A quality insulated garage door can reach R-16 to R-18. The EPS foam kit gets you to R-4.8 — meaningful, but not the same ceiling. For Florida's climate where the primary concern is blocking radiant heat rather than maintaining a heated interior, R-4.8 proved more than sufficient in practice.
The $138 was well spent either way — I get the benefits now, and when the door eventually needs replacing, I'll have no hesitation investing in a pre-insulated door knowing firsthand how much of a difference it makes.
What Is EPS Foam and Why Does It Work Here?
EPS stands for expanded polystyrene — the same rigid foam material used in coolers and packaging. For garage door insulation, it has a few properties that make it a better fit than fiberglass batts:
- Lightweight — critical for a door on springs
- Moisture resistant — fiberglass batts absorb humidity and lose effectiveness over time; EPS doesn't
- Rigid friction fit — the panels snap into the door's existing rail channels without adhesive or fasteners
- Reflective vinyl backing — the finished side faces into the garage, reflects some light, and looks significantly cleaner than raw foam or exposed metal
When researching options, I came across others who had used batt insulation in their garage doors and ran into issues with weight adding up quickly and the batts sagging over time as the door cycled. Neither sounded appealing, which is what pointed me toward EPS foam as the cleaner solution.
The kit I used is the Insulfoam (Henry) Garage Door Insulation Kit rated at R-4.8, with 1.25-inch panels. The panels come kerfed on one side to allow them to bend into place without cracking. Each kit is sized for a single-car garage door — for a two-car door, simply buy two kits.
Garage Door Insulation Fire Rating — What You Should Know
The Insulfoam kit carries a Class A fire rating, which is the highest classification for surface burning characteristics. It's worth understanding what that means and what it doesn't.
Class A means the material has been tested and shown to have low flame spread and smoke development relative to other materials — it does not mean the material is fireproof or fire resistant. EPS foam will burn if exposed to sufficient heat or flame.
Building codes around garage insulation materials vary by municipality, and some areas may have specific requirements about exposed foam insulation in attached garages. Check with your local building department if you have any questions about code compliance for your specific situation before installing.
How to Install Garage Door Insulation Panels
The install is genuinely straightforward. No tools are required beyond a way to cut the panels — a utility knife and straightedge produces cleaner edges with less mess, but I used a table saw and got some rough edges on the early cuts before getting a feel for how the foam behaves on the blade. The edge quality improved noticeably as I went. I'd still reach for the table saw — I don't have the patience for scoring and snapping two kits worth of panels, despite the enormous mess.
Process:
- Measure each panel opening on the garage door — they're not all identical, especially around the horizontal support straps
- Cut the foam panels to width on the table saw or score-and-snap with a utility knife
- For panels adjacent to support straps, cut a notch to fit around the strap hardware
- Friction-fit each panel into the door channel — the kerfed face sits against the door, vinyl side faces the garage interior. No glue or construction adhesive needed or recommended.
- Work panel by panel across the door, then move to the next row
The panels stay in place through friction alone. Skip the adhesive — many common adhesives are incompatible with EPS/styrofoam and will degrade the panel, and keeping them friction-fit means you can swap out an individual panel if one gets damaged without disturbing the rest.
Florida and hurricane-zone note: Florida garage doors typically include horizontal reinforcing bars that run through the panel openings — a requirement for wind load ratings. These bars divide the panel opening into smaller pockets. Rather than cutting panels to fit exactly within each pocket, cut them slightly larger than the opening so the foam can be bowed and slid into the pocket, then allowed to spring back against the edges for a tight friction fit. The kerfed face of the EPS panel works in your favor here — the built-in flex lets you compress and insert without cracking the foam. No adhesive is needed; the oversized cut provides enough tension to hold the panel securely in place.
Cutting tip: A utility knife generates far less debris and is worth considering if mess is a concern. If you use a table saw, expect a significant cleanup — even with a vacuum connected, foam balls go everywhere due to static buildup. A few things that can help: work in humid conditions to reduce static, use a zero-clearance insert to improve vacuum pickup, clean the filter frequently, and consider an anti-static vacuum hose. Keep the area well ventilated and wear respiratory protection — cutting EPS offgasses noticeably.
I used all panels from both kits with small offcuts remaining. The install took roughly an afternoon.
Does Garage Door Insulation Actually Work? (FLIR Results)
Yes — and the FLIR thermal camera footage in the video above is the clearest proof I could offer.
Before the insulated foam panels were installed:
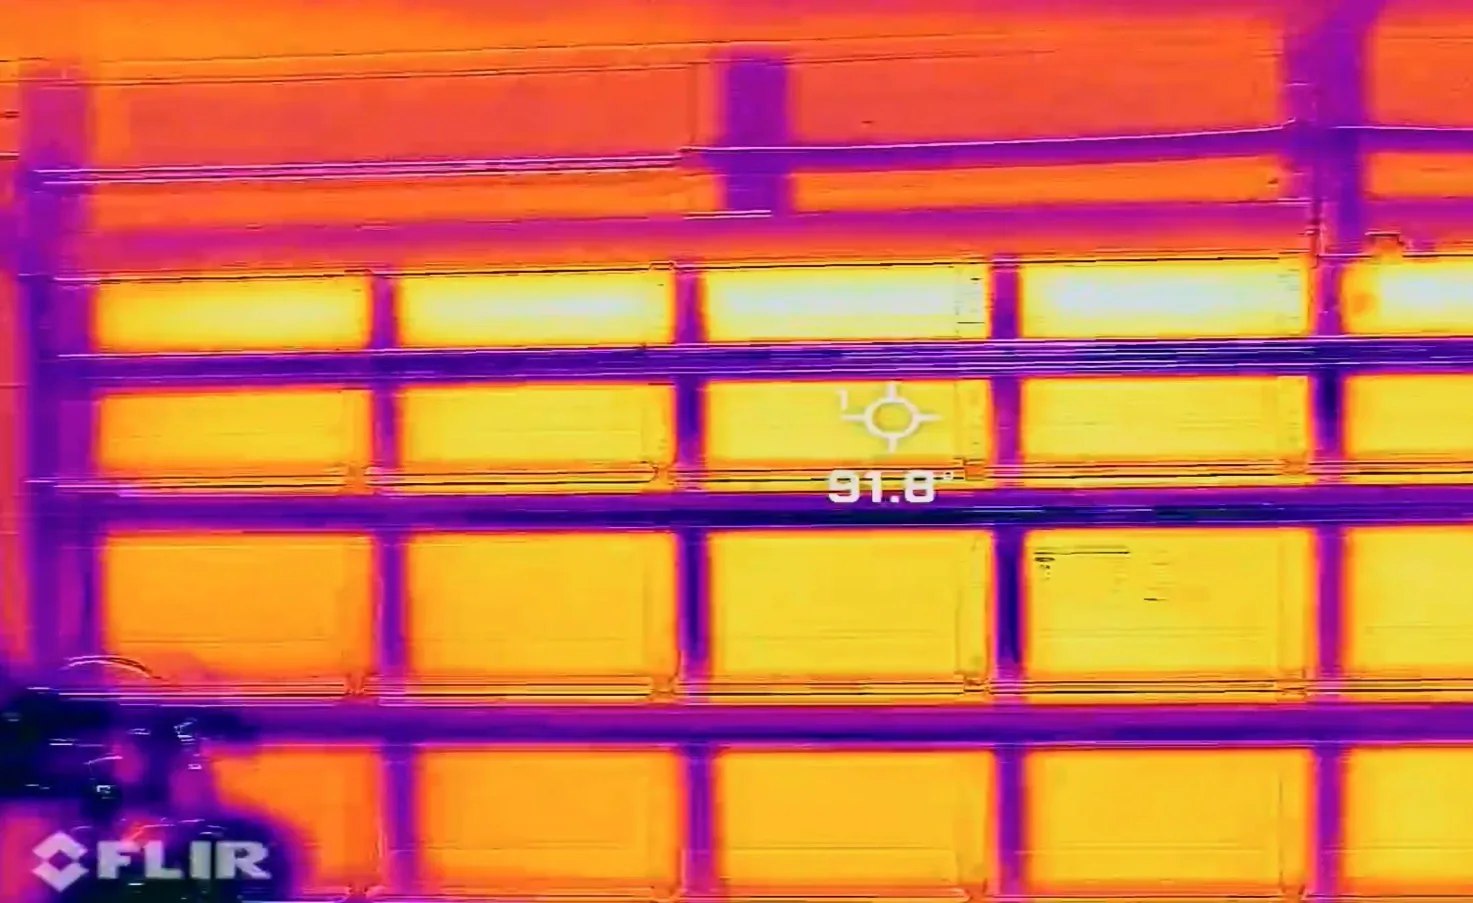
With the first two panels installed in the upper-right section of the door, the thermal camera showed:
- Uninsulated panels: 87–92°F surface temperature
- Insulated panels (adjacent): 75–80°F surface temperature
The difference is visible immediately. The first four insulated panels in the upper-right show up in purple (cooler) while the adjacent uninsulated panels remain orange (hotter):
That's a 10°F difference in surface temperature between panels measured side by side in the same conditions. As more panels were added, the effect compounded — the mini-split load noticeably dropped as coverage increased.
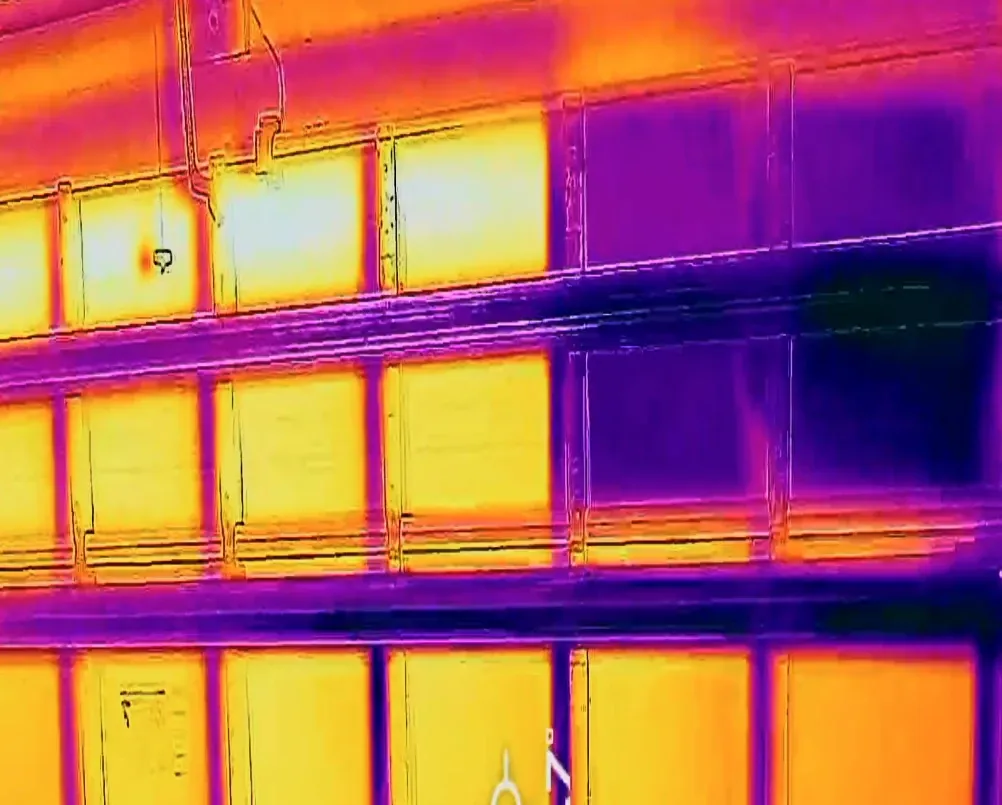
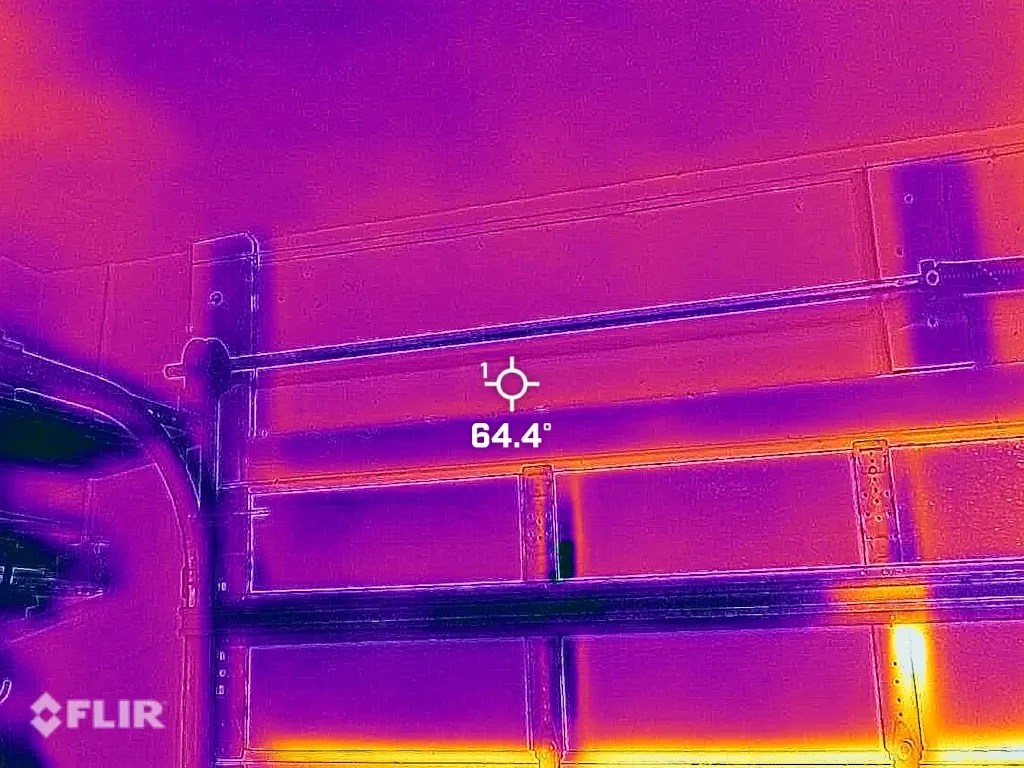
By the time the final panel was installed my metaphorical giant toaster had been replaced by a styrofoam cooler. The FLIR image shows the door surface almost entirely in cooler color ranges, with heat bleeding only through the seams between door panels — an unavoidable gap you can't insulate without preventing the door from opening.
What the FLIR also revealed: The perimeter weather seal at the top and sides of the door was reading significantly hotter than the insulated panels — meaning the rubber seal was degraded and allowing heat in around the edges. The insulation panels can only do so much if the perimeter seal is compromised so I had the seals replaced in a later service appointment.
In FLIR thermal images, white and yellow indicate the hottest surfaces, orange is moderately hot, and purples and blacks are the coolest. The bright orange and white band above the door in the image above is the degraded weather seal — hot outside air bleeding in around the perimeter rather than through the door panels themselves.
After: Garage Door Weather Seal Replacement
My local garage door company quoted $9 per foot to replace the trim and weather seal, so I had it done during a maintenance visit where I was also upgrading the door rollers — easier than keeping it on the to-do list indefinitely. The job involved carefully prying off the old trim without damaging the surrounding paint, cutting the new trim to size, tacking it in place with a staple gun, and finishing with caulk.
The new trim comes with weather stripping pre-attached:
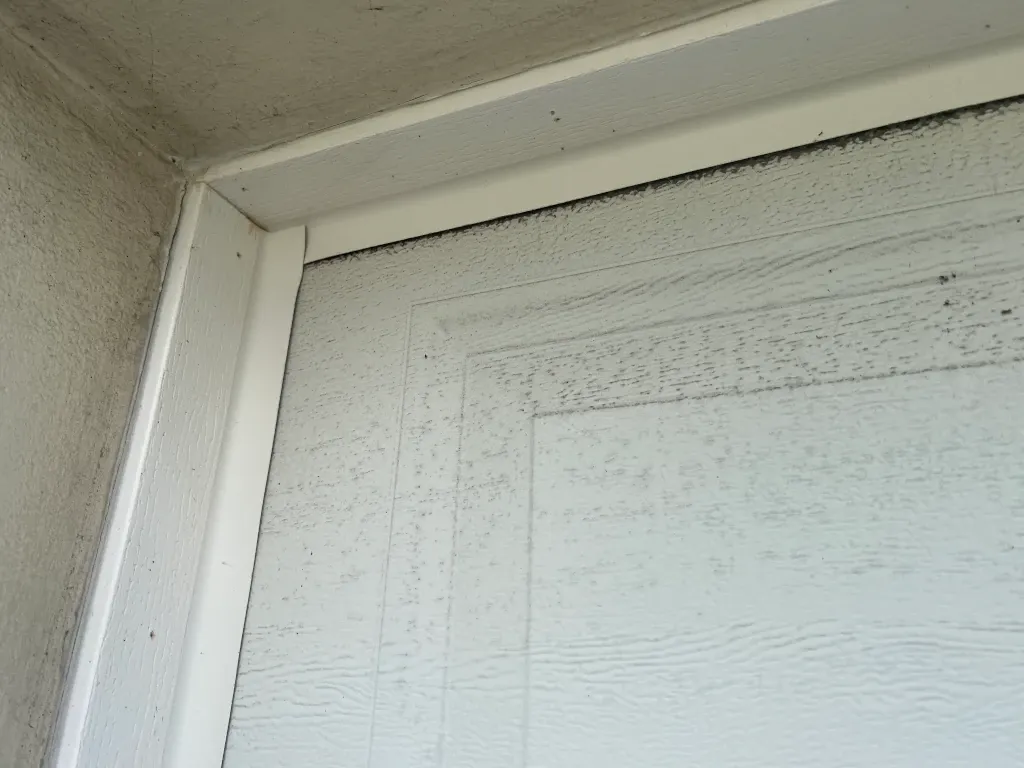 Yes, its due for a wash
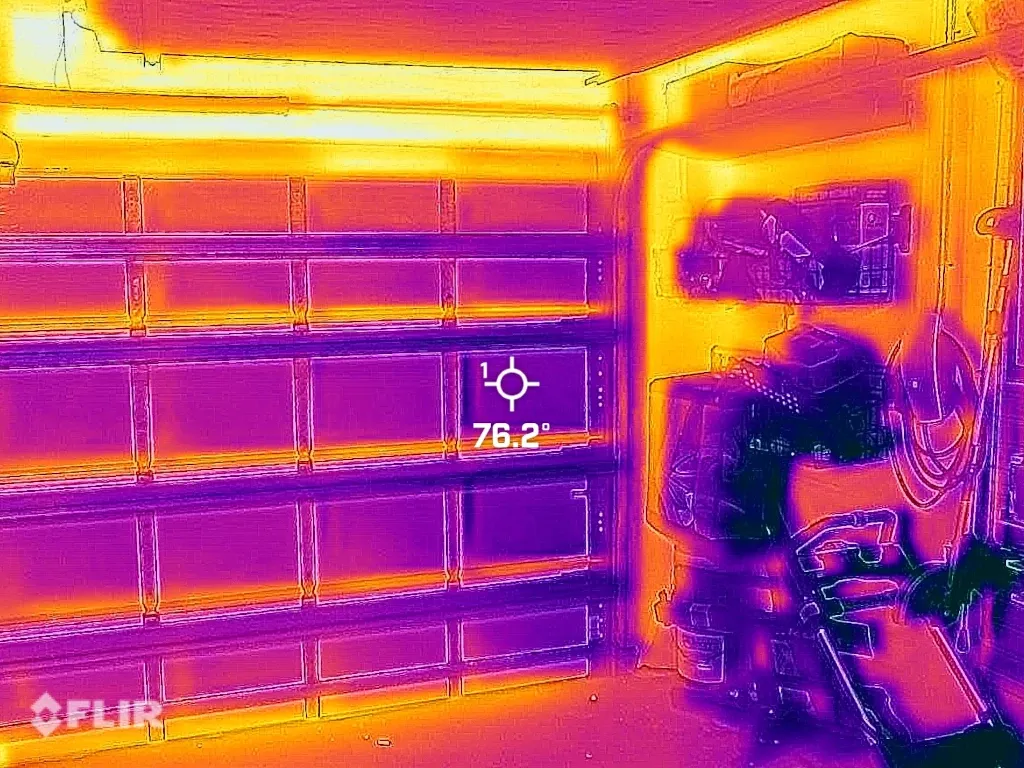
After replacing the seals, the area above the garage door shows significantly less heat infiltration. The previously bright orange band is now mostly purple, confirming the new weather stripping is doing its job blocking hot outside air from leaking in around the perimeter.

Will Adding Insulation Make Your Garage Door Too Heavy?
This question kept me from undertaking the project for years. I didn't want to look for trouble and risk breaking the garage door spring or some other unforeseen thing versus leaving it alone.
Each Insulfoam kit adds approximately 7 lbs to the door. Two kits = 14 lbs of added weight on a door that likely weighs 150–200 lbs depending on size and material. That's roughly a 7–10% weight increase.
Technically, garage door spring systems are calibrated to the door's weight, and a meaningful weight addition can affect balance — an unbalanced door puts more strain on the opener motor and spring hardware. If you're adding significant weight, having a garage door technician check and adjust spring tension is the by-the-book recommendation.
In practice, I ran the door for several months after installation without adjusting the spring and didn't notice a meaningful difference in operation. My garage door spring did eventually fail — but the failure appeared to be age-related rather than insulation-related. When the spring was replaced, the technician tensioned the new spring accounting for the full door weight including the insulation panels.
If your door is already operating near the upper limit of its spring tension or is several years old, it's worth having the spring checked when adding any meaningful weight. When in doubt, consult a garage door professional before and after installation — garage door springs are under extreme tension and should only be adjusted or replaced by a trained professional.
Real-World Results: Garage Temperature Before and After
In peak summer, the 12,000 BTU mini-split was previously holding the garage at around 77°F when outside temperatures exceeded 94°F. With the insulated door, the heat load the unit has to overcome is meaningfully reduced — the door is no longer a significant radiant heat source working against it. Some of the online BTU sizing calculators I ran across for mini-split ACs suggested 12,000 BTU might not be enough to deal with a two car garage in Florida, but in practice insulating the garage door and addressing air leaks allowed me to use the smaller AC unit.
In the cooler Florida months (December through March), with the insulation in place, the mini-split is able to bring the garage temperature into the upper 60s°F with a 70°F set point — even when outside temperatures are mild but the metal door would otherwise be radiating stored heat. That level of cooling performance wasn't achievable before the insulation was added, and it's made the garage gym genuinely usable year-round rather than just survivable in summer.
Garage Door Insulation Tips: What I'd Do Differently
- Utility knife vs. table saw — use a utility knife if mess is a concern; the table saw is faster and produces precise cuts once you get a feel for the foam, but be prepared for statically charged foam balls to go everywhere. See the cutting tips in the installation section for mitigation strategies.
- Measure each panel opening individually. The openings aren't perfectly uniform, especially around the horizontal support straps — treating them as identical will give you gaps.
- The notch cuts around support straps take the most time. Budget extra time for those panels rather than treating every cut as equal.
- The vinyl backing brightens the garage. An unexpected benefit — the white reflective surface on the inside of the door adds noticeably more light reflection into the space.
- Check your weather seal while you're at it. The FLIR camera made the perimeter seal problem obvious — if you have a thermal camera, use it after install to identify any remaining hot spots.
The Bottom Line
For $138 and an afternoon of work, EPS foam garage door insulation is one of the highest-ROI home improvement projects for anyone dealing with a heat-loaded garage in a hot climate. The FLIR results are hard to argue with — a 10°F surface temperature reduction across the entire door translates directly to less heat load on your AC and a more comfortable space.
It's not a replacement for proper HVAC or a modern insulated door if you're starting from scratch — but for an existing garage door in serviceable condition, it's the right first move before anything else. Depending on your climate, you may find that insulation combined with a good shop fan is enough to make the space comfortable without adding active cooling at all. One thing insulation won't do is reduce humidity — and depending on your climate and season, that may or may not matter. In South Florida it's often the bigger comfort factor. For me, now using both, the space feels like an extension of the house and is pleasant to use as a workshop and home gym.