
Testing Software using Decision Tables
Decision tables are software testing tools used to ensure one fully captures the expected behaviors of features involving complex business rules. Once created, decision tables provide valuable documentation of the software's desired behavior that one can directly use to create their test cases with. Learn how to create and use decision tables for testing your next Agile story in this article.
Decision tables excel at capturing use cases for software features involving complex business logic. When taking a shift left approach decision tables can be used to test the business requirements by making sure they are complete and make sense when combined. In addition, adding the decision table to the requirements creates clearer documentation about how the feature should work, before code is written, allows the engineers to write less expensive unit and integration tests while developing the software, and removes ambiguity around how a new feature should work.
Watch the lesson video below or continue reading the full article below it to learn more about testing using decision tables.
Why you should use Decision Tables
Decision tables help foster communication and collaboration on agile teams because the process of creating one
- Has the test engineer work with the business analyst to document all explicit and implied outcomes, decisions, in their requirements or spec (testing the requirements, shift left).
- Creates a blueprint for engineers to code against.
- Creates 1 to 1 test cases that are known before coding begins, preventing rework.
- Helps to prevent missed test cases or make informed decisions on what not to cover.
- Creates an artifact that can be used as documentation of how the feature should work in the future or serve as an oracle for test cases.
- Creates a visible list of how many tests are needed to cover a feature story, to track progress, share the work of automating the tests, or manually running them.
When to use Decision Tables
Some tools work better at different tasks than others. Software test engineers should keep decision tables in their software testing toolbox to use when it makes sense to do so.
So when does it make sense to use a decision table?
- When testing features with complex business logic or rules
- When testing features where outputs are based on several input combinations
- When testing features where combined inputs have many acceptable inputs that are not equivalence classes
Some examples include testing tax filing logic, order bar for stock trading, and UI with multiple inputs and actions.
When not to use Decision Tables
Decision tables work best when testing applications that have inputs that can be mapped to discrete values and outcomes. A feature under test that doesn't map nicely in that way may not be a good fit. In addition, when you are testing a simple feature the overhead added by creating a decision table may not provide as much of a benefit versus the time spent creating it.
How to Create Decision Tables
Typically one would use a spreadsheet program like Excel or Google Sheets to build the decision table, but anything that can list data in table form would work.
At a high level, one would start by determining all the conditions and their input values. Those are then mapped out into a matrix that covers all the possible combinations. Below the matrix of inputs would be the expected behavior that should occur for each column of values.
Let's look at a generic and then specific example in this section to make that more clear.
First, in the generic example, let's imagine a program we are testing that has 3 settings. The first two have can be on or off (true or false) and they default to true. The third option does not have a default setting so it can be null, but the user can select on or off (true or false).
In the spreadsheet list the settings under a Conditions column and the values the conditions can take in an adjacent Values column as shown below.
| Conditions | Values |
|---|---|
| Setting 1 | T, F |
| Setting 2 | T, F |
| Setting 3 | T, F, Null |
Next, we need to figure out all the combinations of inputs we'd need to exhaustively test the program. To do that you multiply the count of values each setting has together.
(Setting 1 Value Count) * (Setting 2 Value Count) * (Setting 3 Value Count)
In our example that would be
2 * 2 * 3 = 12
So we would need 12 tests to exhaustively test this application. Now that we know the combinatorial test count we need to fill out the rest of the decision table with the test data values. We will create a column to the right of the Values column that will hold our values for each test.
To fill in the values for our first condition, Setting 1, we will repeat the value for N number of columns based on the total test count (12) divided by the number of values (2). 12 divided by 2 is 6 so we will repeat T (true) for 6 columns and F (false) for the next 6.
| Conditions | 1 | 2 | 3 | 4 | 5 | 6 | 7 | 8 | 9 | 10 | 11 | 12 |
|---|---|---|---|---|---|---|---|---|---|---|---|---|
| Setting 1 | T | T | T | T | T | T | F | F | F | F | F | F |
For the next row, we divide the 6 we got in the previous step by the number of values in Setting 2, 2. 6 divided by 2 is 3 so we will repeat the values in next row every 3 columns.
| Conditions | 1 | 2 | 3 | 4 | 5 | 6 | 7 | 8 | 9 | 10 | 11 | 12 |
|---|---|---|---|---|---|---|---|---|---|---|---|---|
| Setting 1 | T | T | T | T | T | T | F | F | F | F | F | F |
| Setting 2 | T | T | T | F | F | F | T | T | T | F | F | F |
For the last setting we divide the 3 from the previous step by the number of values Setting 3 has, 3. 3 divided by 3 equals 1 so we will alternate T, F, or N (for null) in each column.
| Conditions | 1 | 2 | 3 | 4 | 5 | 6 | 7 | 8 | 9 | 10 | 11 | 12 |
|---|---|---|---|---|---|---|---|---|---|---|---|---|
| Setting 1 | T | T | T | T | T | T | F | F | F | F | F | F |
| Setting 2 | T | T | T | F | F | F | T | T | T | F | F | F |
| Setting 3 | T | F | N | T | F | N | T | F | N | T | F | N |
Now, our decision table has a mapping of all the values for each one of our test cases. We can use this data to conduct our tests. For example, for our first test, test 1, we'd set each program setting to T, true. For test 11, we'd run the test with every setting set F, false.
All we are missing now is the expected conditions for each test or what the program is supposed to do when run with these values. This exercise ends up testing the requirement which might uncover missing or conflicting requirements before the code is even written which makes decision tables a great tool to aid in shift left agile teams.
We will capture the expected effects or actions in an Actions section below the setting values in the table.
| Conditions | 1 | 2 | 3 | 4 | 5 | 6 | 7 | 8 | 9 | 10 | 11 | 12 |
|---|---|---|---|---|---|---|---|---|---|---|---|---|
| Setting 1 | T | T | T | T | T | T | F | F | F | F | F | F |
| Setting 2 | T | T | T | F | F | F | T | T | T | F | F | F |
| Setting 3 | T | F | N | T | F | N | T | F | N | T | F | N |
| Effects | ||||||||||||
| Enable Foo | Y | N | N | Y | N | N | N | N | N | Y | N | Y |
| Enable Bar | Y | Y | Y | N | Y | Y | Y | N | N | N | N | N |
As a final step you can collapse some columns, exclude certain combinations, that may be not reachable by an end user in practice or where one of the settings overrides the other settings yielding equivalent results though this can be risky since it assumes certain things about the implementation. Doing so can cut down on the number of test cases required to run at a potential risk of missed code coverage.
Here is an example of a real decision table testing payroll direct deposit functionality where the file group, test mode setting, and whether or not it is triggered on demand, control behavior of direct deposit file consolidation.
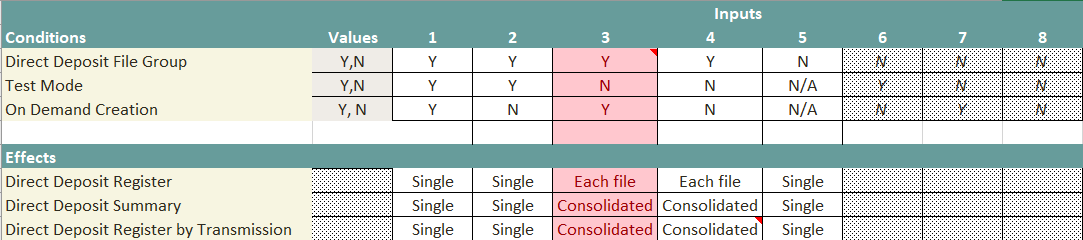
Red highlighting was used to indicate a defect discovered in testing of the feature. In addition, columns 6-8 are an example of column collapsing. They were collapsed because if the file group is not a direct deposit file group it doesn't matter what the other settings are set to so a decision was made that testing it once using the test in column 5 would provide sufficient coverage.
How to use a Decision Table
Now that we've learned how to construct a decision table in the previous section we can use the values from the numbered test case columns to construct the inputs and expected results for our tests.
For example, a given/when/then formatted test case for test 5 would be
Given Setting 1 is T
And   Setting 2 is F
And   Setting 3 is F
When I run the program
Then Enable Foo will be set to N
And  Enable Bar will be set to Y
Decision tables nicely map well into parameterized row fixtures in unit test frameworks that support the concept like nUnit. This allows you to write the test case once and just vary the input values passed in.
[Test]
[TestCase(true, true, true, 'Y', 'Y')]
[TestCase(true, true, false, 'N', 'Y')]
[TestCase(true, true, null, 'N', 'Y')]
public void ExampleTest(bool setting1, bool setting2, bool? setting3,
  char fooExpectation, char barExpectation)
{
    MyApp.changeSettings(setting1, setting2, setting3);

    Assert.AreEqual(fooExpectation, MyApp.getFoo());
    Assert.AreEqual(barExpectation, MyApp.getBar());
}
More Reading
Below are some techniques that cover this and other software testing techniques. As an Amazon affiliate I earn from qualifying purchases made from these links which help support this site.
- Pragmatic Software Testing
- A Practitioner's Guide to Software Test Design
- More examples on guru99
- Another article from methods and tools
If you liked this article please share this link with others and feel free to reach out using one of the social links below 🤗