Automated Visual Regression Testing Guide - Best visual tools, how, and when to use them
Visual regression testing is a QA testing technique effective at catching look and feel or layout regression defects and catching bugs that you aren't explicitly looking for in your tests. These tests can be flaky or high maintenance without the right combination of visual testing tool, platform, and style so this guide will help you pick the best visual regression tool and write maintainable visual tests.
Visual regression testing is a software testing technique you can use to write automated test cases against your web applications to look for unexpected visual changes, visual regression defects. This guide will cover what visual testing is, when to use it, and how to create end-to-end visual tests in SauceLabs Visual and Nightwatch.js.
Advantages of Visual Testing
Visual testing can be more effective at testing for look and feel, visual, and layout changes in your UI than traditional functional automated test assertions that rely on checking against value or attribute changes.
High level, visual tests compare a screenshot of the web application against a known baseline and report visual differences as errors. This is a kind of check-everything-at-once approach whereas functional tests require an explicit check of each field you are expecting a bug could appear.
A picture is worth 1000 asserts 🙃
The need to write an explicit check for every area you want to cover can make a typical automated functional test more work to code than a visual one. For example, "requiredness field checks" on a form may cause *required labels to appear on 10 fields. You could write 10 assertions to verify they are there or just 1 visual test could cover that required-error-state with the bonus that they render where expected on screen.
More importantly functional tests can miss areas not explicitly checked. There are an infinite number of future things that can go wrong with your application and trying to cover them all with explicit assertions is not possible.
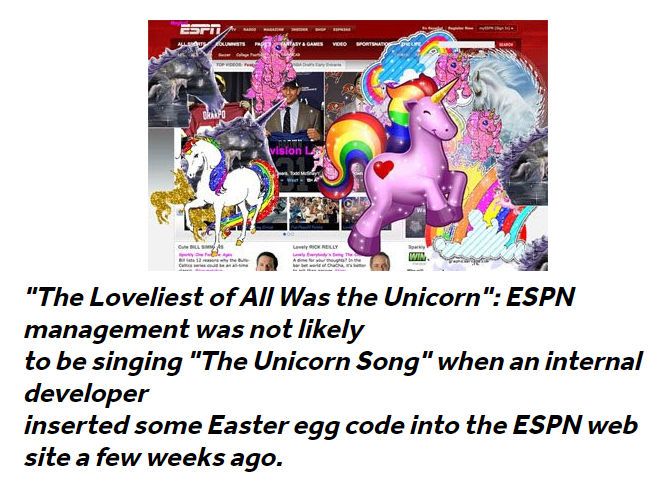
A perfect example is the infamous easter egg that a developer checked in to the ESPN website back in 2009 causing unicorns to appear all over the site. Legend has it this was not supposed to get deployed to production, but there were no tests to explicitly verify unicorns did not appear on the home page giving this surprise to users...
A visual regression test would have caught this.
With functional tests, it is hard to test rendered appearance on the screen. Your tests can check things like CSS attributes and values, but not if between releases a CSS defect is introduced that causes a weird rendering artifact in the user's browser or if an update to a browser or UI framework negatively changes the site appearance.
Functional tests can assert a class is applied, but not how it visually appears on screen.
Lastly, with the right visual automation tools and platform you can quickly reuse your same visual tests to do cross-browser, cross OS, and mobile platform tests in parallel.
Summary of Visual Testing Advantages
- Functional tests are narrower, test only explicit areas, or find expected bugs
- Functional tests require more code, more maintenance
- Functional tests are weaker at finding cross-browser issues
- Visual tests can cover an entire page state in one assertion
- Visual tests can find unexpected bugs instead of just expected ones
Visual testing a strong tool to use for covering visually heavy functionality, but before you go and replace all your test automation with visual tests there are some disadvantages with visual testing that will be covered in the next section.
Disadvantages of Visual Testing
Visual tests will cast a much wider net with less code alerting you to potential issues your functional tests may miss. The downside is they have the potential to be more flaky, slower, and they don't provide as much at-a-glance specifics about a failure than a functional test would. For example, a visual test will alert you that something visually changed vs a functional test which would be more specific like expected value quantity-on-hand to be 10, but got 11.
On many platforms this may require you going into another system to see the failure or accept baselines or changes which doesn't feel as cohesive to me.
Your experience with visual testing can vary widely depending on what automated visual testing tool you pick. Historically, I always considered them to be very fragile and required a lot of maintenance. This is because early tools would look at a baseline image you have stored and compare it the current snapshot of that screen the next time you run your test on a pixel-by-pixel.
This led to the following problems.
- Where and how do you store/manage your baseline images? That becomes a problem at scale.
- Different operating systems or OS settings may render the page differently, polluting baselines or causing false positives--especially on a larger team with non-homogenous workstations.
- Updates to site style, colors, or universal elements (like banners or logos) break all your tests, and require making new baselines
- Vague reporting of what was actually different (the report may just provide a % different and not help you see where)
- No great way to deal with dynamic content
Fortunately, newer tools have addressed most, if not all, of these issues making them viable as a useful tool for covering visually heavy areas of an application. One such tool is SauceLabs Visual (fka Screener.io) which I've started to evaluate for Visual end-to-end regression testing with Nightwatch.js.
SauceLabs Visual with Nightwatch js
SauceLabs is a cloud testing service that allows you to execute tests, including visual tests, against their remote VMs. It works with popular automation frameworks including WebdriverIO, Nightwatch, Cypress, and Playwright that drive the tests to remotely control the browsers in their offsite VMs. For visual testing, it does require a selenium/webdriver-based automation platform. This excludes Playwright and Cypress.
My automation suites already used Nightwatch for automated functional tests of the UI so I decided to use it for evaluating SauceLabs' visual testing tool capabilities as well. During my evaluation I found it to be the best visual testing tool overall for addressing my historical concerns with visual testing tools.
To run visual assertions in SauceLabs you configure your test suite to run through their hub.screener.io proxy which listens for special commands you send through the browser you are controlling in your UI automation framework, like Nightwatch.
it('should take snapshot', () => {
  browser.url('https://screener.io');
  browser.execute('/*@visual.init*/', 'My Visual Test');
  browser.execute('/*@visual.snapshot*/', 'Home');
});
This is ugly, but keep reading, it gets better
Alternately, if you use Storybook and are interested in visual testing of your UI components SauceLabs Visual can integrate with Storybook as well.
One of the nice things about Nightwatch is how extensible it is so I wrapped SauceLabs' visual testing implementation into custom assertions to allow you to perform visual testing in Nightwatch js. This is available on npm as nightwatch-saucelabs-visual. This allows me to write much prettier tests like
'Content should not move around': (browser) => {
  browser.beginVisualTest('Shifting content example');

  browser.page.shiftingContent().navigate();
  browser.page.shiftingContent().click('@example1Link');

  browser.takeSnapshot('Menu page');

  browser.assert.visuallyTheSame();
}
Examples are provided later in the guide.
Advantages of using SauceLabs for Visual Testing
- The baseline screenshots and history are stored in their cloud
- Their VMs are static to your desired configuration so baselines won't be polluted by different developer workstations
- Ability to test browser and operating systems outside of what you have available on site.
- Combines knowledge of the DOM with the screen comparison
- Let's you ignore specific DOM elements (vs % change tolerances or regions)
- Highlights DOM elements where changes were detected
- Let's you accept changes at the DOM element level for faster baseline updating
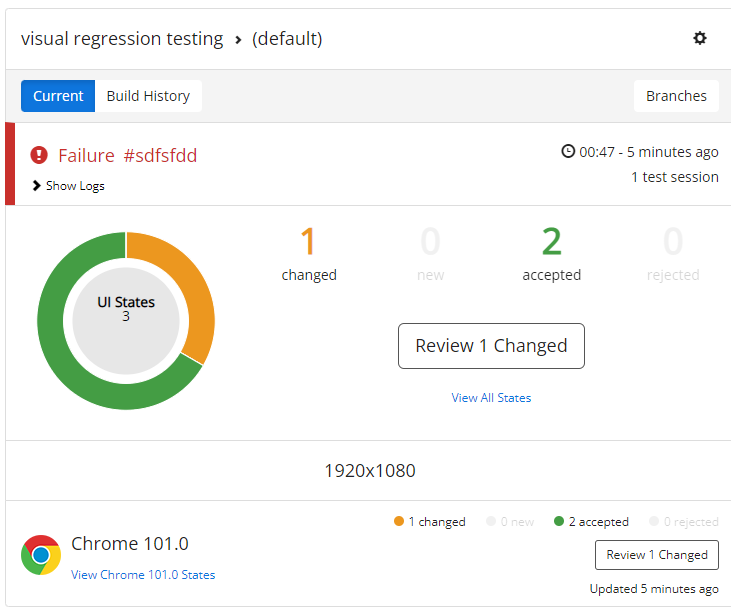
 Highlighting changed DOM element
Disadvantages of using SauceLabs for Visual Testing
- Their hub is slower to execute tests
- Snapshot and assertion checks take much longer than functional test steps
- You have to log in to their web portal to accept the baselines or see screen captures
- As of writing the SauceLabs visual product doesn't feel as integrated into their main tools
- Extra login step
- Limited number of tests allowed per month
Writing a Nightwatch Visual Regression Test with SauceLabs
Most of the examples on SauceLabs' website are geared toward WebdriverIO so this will serve as a useful guide for getting started writing automated visual regression tests using Nightwatch and SauceLabs Visual.
For brevity, these examples assume you are modifying an already working Nightwatch test suite to add visual testing. If you don't have one setup or would use the final product to follow along with, the code for this example can be found on GitHub under nightwatchTutorials/sauceLabsVisualScreener.
- In the root of your test project, run these commands to install the npm packages we will be using
npm install nightwatch@latest -gnpm install nightwatch-saucelabs-endsauce nightwatch-saucelabs-visual saucelabs --save-dev
- Open
nightwatch.config.jsand add or append tocustom_commands_pathandplugins
  custom_commands_path: [
    './node_modules/nightwatch-saucelabs-endsauce/commands',
  ],
  plugins: ['nightwatch-saucelabs-visual'],
This will allow Nightwatch to add the custom commands and assertions to run against SauceLabs and execute visual test assertions.
- Lower down in
nightwatch.config.jsappend the SauceLabs communication and credential settings inside thetest_settingssection. Note the use of${SAUCE_*}environment variables so you don't check in account credentials with your source code. You can replace these with your actual SauceLabs account values for local testing or see my other article where it covers setting environment variables for SauceLabs. This will allow the tests to run through the SauceLabs Visual hub using your account settings.
  test_settings: {
    default: {
      launch_url: 'https://www.davidmello.com',
      skip_testcases_on_fail: false,
      webdriver: {
        start_process: false,
      },

      desiredCapabilities: {
        browserName: 'chrome',
        screenResolution: '1920x1080',
        browserVersion: 'latest',
        javascriptEnabled: true,
        acceptSslCerts: true,
        timeZone: 'New York',
        chromeOptions: {
          w3c: true,
        },
        'sauce:options': {
          username: '${SAUCE_USERNAME}',
          accessKey: '${SAUCE_ACCESS_KEY}',
        },
        'sauce:visual': {
          // API key found Account -> API Key from within Sauce Visual portal
          apiKey: '${SAUCE_VISUAL_API_KEY}',
          projectName: 'project name here',
          viewportSize: '1920x1080',
        },
      },
      selenium: {
        port: 443,
        host: 'hub.screener.io',
        protocol: 'https',
        path: '/wd/hub',
        start_process: false,
      },
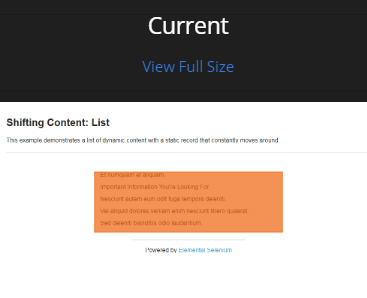
After you configure Nightwatch with those steps you can write your first visual test. The example below uses a special automation practice website that changes the layout of elements on the page on every visit making it a good for practicing visual tests (click here for more websites for practicing test automation)
shiftingContent() in the code below is a page object part of the example repository under page-objects/shiftingContent.js
// /test/shiftingContent.js
module.exports = {
  before: (browser) => {
    // beginVisualTest needs to be called just once before you start taking snapshots
    browser.beginVisualTest('Shifting content example');
    browser.page.shiftingContent().navigate();
  },
  after: (browser) => {
    // endSauce will update the SauceLabs automated test run log with the test name and results
    browser.endSauce();
    browser.end();
  },
  'Content should not move around': (browser) => {
    browser.page.shiftingContent().click('@example1Link');
    // takeSnapshot can be run at each page or page state you want to ensure remains visually the same
    browser.takeSnapshot('Menu page');
    browser.back();

    browser.page.shiftingContent().click('@example2Link');
    // takeSnapshot can be called multiple times per test
    browser.takeSnapshot('Image page');
    browser.back();

    browser.page.shiftingContent().click('@example3Link');
    // As a second parameter you can pass a list of css selectors the test will ignore. Useful for dynamic or irrelevant content.
    browser.takeSnapshot('List page', '.adBanner,#logo');

    // Run assert.visuallyTheSame() to check the snapshots taken against baselines and output pass or fail
    browser.assert.visuallyTheSame();
  },
};
As mentioned in the comments, you can pass a second parameter to either beginVisualTest or takeSnapshot of type string containing a comma separated list of CSS selectors to ignore globally for the test or on that snapshot respectively. This allows you to filter out duplicative content or highly changing elements like banners or ads to make your tests less flaky and require less maintenance.
You can then run nightwatch --test ".\test\shiftingContentTest.js" to execute the test and get some output similar to this
[Shifting Content Test] Test Suite
────────────────────────────────────────────────────────────────────
ℹ Connected to hub.screener.io on port 443 (8203ms).
  Using: chrome (101.0.4951.41) on WINDOWS.

  ℹ Loaded url http://the-internet.herokuapp.com/shifting_content in 2595ms

  Running Content should not move around:
───────────────────────────────────────────────────────────────────────────────────────────────────
  × Verifying the snapshot has no visual regressions in 5000ms - expected "0 visual regressions'" but got: "1 visual regression found. Test failed.

View report: https://screener.io/v2/dashboard/js1dhfkdh22fs1df8/(default)" (18283ms)
    at Object.Content should not move around (C:\Projects\nightwatchTutorials\sauceLabsVisualScreener\test\shiftingContentTest.js:33:20)


FAILED: 1 assertions failed (35.068s)
The test will fail the first time because there is no baseline. You follow the report URL in the output to navigate to your test run and accept the baselines as applicable the first time through. After, any following runs should pass unless visual regressions are detected.
Final Thoughts
Visual Regression testing fills an important coverage gap for testing the visual appearance of your site. Like any specialized tool it makes certain tasks much easier and is worth the investment if you get enough use out of it.
I feel you'd need to use a managed platform such as SauceLabs or Applitools for it to scale well rather than rely on the built-in visual testing functionality some test automation frameworks like Playwright have included. At scale, managing snapshots and workstation variances polluting snapshot baselines become an issue otherwise.
Due to their slower execution times and added cost I'd limit visual regression testing to verifying visually heavy functionality and critical areas of the site or where casting a wide net possibly finding more issues has more value than more quickly knowing the specifics of a failure at a glance.
If you are a Nightwatch beginner, be sure to watch my Software Testing Playlist.
Please share the link to this article if you enjoyed it and if you have any questions or comments, please reach out through my social links below 👇